Read More http://www.kevinandamanda.com/whatsnew/tutorials/how-to-use-a-cute-font-for-your-blogger-post-titles.html#ixzz1IJCcBak7

Thursday, February 25, 2010

Tiered Stand

When I saw this made by Jen @ Tatertots and Jello, I fell in love...


Then, when I found out it cost only $2 dollars to make, I became obsessed!
So I made me one.
I went out and got my materials.
I followed Jen's tutorial here.
And, here's what I was able to create...

Then, of course I started craving sugar cookies.
So, the little one and I enjoyed these for dessert last night (hubby's not too into sugar cookies).
What do you think? Not a bad way to end the night...


Wednesday, February 24, 2010

New Nightstand!

So, I have these two pieces of furniture...
The top one I used as a nightstand in my bedroom.
The bottom one was in my living room just taking up space.

The other day, I decided it would be better if they worked together.
Therefore, we have this...

Then, I went out and bought two of these storage containers from JoAnn's.
I decoupaged them by doing the following.

Painted 2 coats of FolkArt Acrylic paint on the inside and outside.
I love this blue. It's called Cayman Blue.

Measured out the size of paper for each side, leaving 1/2 inch around each border (so the blue can stick out past the paper).
Cut out the paper to the measurements made (I used 8 pieces of 25 cent scrapbook paper).

Painted a layer of Mod Podge-Matte on the inside and top.
Painted a layer of Mod Podge-Matte on the outside and put the paper on each side.
Then, when that dried, I painted another layer of Mod Podge on the outside.
And now we have this...
*Note: I didn't cut out the handle holes, but you can do that using an exacto knife.

Yesterday, I found this piece.

I decoupaged it the same way as the storage bins.
I'm still on the lookout for a drawer (or something that can be made into a drawer) for the inside.

Here is my finished nightstand (minus the drawer).
Hope you like it!

Linking to:

Friday, February 19, 2010

Changing the Changing Table...

Oh, what to do with that changing table that's taking up too much room in my small, one bedroom apartment?
The same changing table that I should've never bought in the first place because I just changed my little one on the bed or the carpet...
The same one that is just an excuse to pile things on, instead of putting them away...

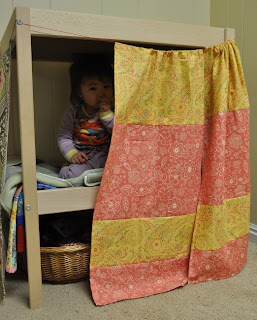
Answer: Clubhouse/Toy Storage!!

Take a look at our new clubhouse!
I finally cleared off the top, brought it into the living room, pulled some scrap fabrics together, and came out with this.


There's enough room to store toys under it.

And, my little one loves it.
She keeps saying, "Thank you Mommy, my cwubhouse."

Now, I need to find the right basket for the top...

I'm linking to...

giveaways


Hope you have a good day!!

Tuesday, February 16, 2010

Bloggy Buttons...

Do you ever have moments where you are SO COMPLETELY proud of what you've accomplished that you just have to tell everyone you encounter...and possibly get on a rooftop and shout it to the world?

A few weeks ago I had one of those moments...
And since I don't get out too often,
I probably told my poor hubby what I did more times than he wished to hear.
I also asked him if he was PROUD of me more times than he wished to answer.
Now, here I am again having another "Proud of Myself" moment!
And, in order to spare my husband some grief, I shall tell you...
I created my own button and header!!
Aren't you SO proud of me?!

I know, I know, it's not much...
but I'm so proud of myself.
It took me WAY too long than it should've,
which is why I'm so proud to have actually done it.
It's simple, but I love it.

Many thanks to Shabby Blogs for the wonderful tutorial!
I also used:
Picasa
Picnik
and
Photobucket

So here it is...my button to grab!

Photobucket


Thanks for listening!


Sunday, February 14, 2010

Unfinished Projects...

I am infamous for not immediately finishing many of my projects...just ask my hubby.
For me, inspiration for a project often comes and goes quickly...I'm not sure why.
But I am currently determined to complete my unfinished projects.
Here is one project I started almost a year ago, to quickly lay aside when not knowing how to finish it. I have often thought about it since putting it aside, but it wasn't until Saturday that the inspiration I needed to finish the dress finally came to me. The finish product is slightly different from what I imagined it to be, but I love it.
Let me know what you think...

Now, let me tell you something about 2 year olds, especially this one.
Nothing, except sleep, can stop her from moving.
So please, enjoy the pictures!


Tuesday, February 9, 2010

Books and Mod Podge...


I don't know if any of you are like me, but when I get my hands on a good book I'm completely and totally engrossed until the last page...of the last book (if it's a series).
So, this last week, I've been overindulging on some excellent books, while neglecting my crafting endeavors. However, between pages, I was able to take a little walk into the world of Mod Podge. And let me tell you, it was fun and exciting! I enjoyed myself, and made two picture frames using some of what you see below...

So..the ingredients to make a simple (but sweet) picture frame:
1. Some Mod Podge (I bought mine from JoAnn's for $4, use a 50% coupon and make it even cheaper)
2. A picture frame (JoAnn's has these for $2)
3. A sponge brush ($0.39 at JoAnn's)
4. Some scrapbook paper (or any other paper you have including magazines)

Now, I don't have any pictures of the process, but it's simple enough.
First, decide what you want your background paper to be, and cut enough for it to fit around the entire frame.
Second, paint a layer of mod podge on the frame and stick your background paper on.
Third, paint another layer of mod podge on top of the background paper, and place your design on top of this mod podge layer. Let dry.
Next, paint a layer of mod podge on the entire frame (including the sides) to add a finishing layer. Let dry.
Finally, step back and admire your work.
Here's my work:
*Note...please don't mind the first frame, I didn't realize the ink would smear when I put the mod podge over it.


Enjoy! Jenn